Professional Foot Care Sanding Basics, part 1
If you have not already done so, we encourage you to try an
in-person workshop to become comfortable with sanding on real patients. During our hands-on classes, we use every available tool to help you practice and understand your personal sanding style.
Below, we will recap the basics of sanding. Do not attempt these techniques unless you are a trained healthcare provider with experience in toenail sanding.
Instruments:
There are various instruments available to us, from the workhorse Dremel to European-style sanders most commonly used in pedicure salons. Use the instrument and attachments you have learned to prefer.
Attachments:
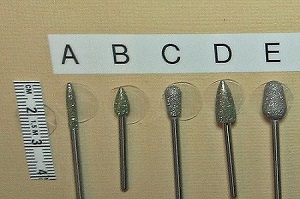 Burrs and disks come in a variety of shapes, sizes and degrees of coarseness.
Diamond burrs are not very effective on skin, which also means that bleeding is not likely to occur. Small diamond burrs are ideal for tight spaces.
A flat disk is perfect for thinning the top of the nail. Disks work well on tough skin, small corns and calluses.
It’s important to choose and stick with an attachment that works for you. Your goal isn't to move back and forth between grits, but simply to learn when to push harder and when to ease up.
Attachment Sizes:
Diamond and carbide burrs come in all shapes and sizes, and can complete many jobs. An ultra-skinny diamond burr is perfect for reaching the sides of the nail.
Sanding disks are most versatile when used in a 5/8 inch or 7/8 inch size.
Preparing the Dremel:
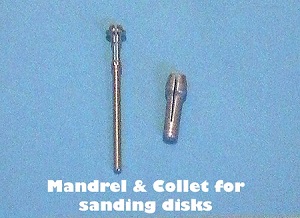 Barrel, cap and disk attachments require a mandrel.
Occasionally, the mandrel forks will be too close together or too far apart. In order to fix this, use an eyeglass repair screwdriver to widen the space or use pliers to squeeze the forks together.
Note: The sizes of the attachments may require you to change the collet one time before getting started. This is because American sanding devices like the Dremel will not fit the discs or burrs we use during foot care sanding.
Techniques:
 Hold your instrument at a 45-degree angle. Using a 90-degree angle will result in a cut.
Turn the angle of your disk toward your stroke and move forward, never backward.
Use your peripheral vision to do the work. This way your attention stays focused on the skin.
Ensure you adjust your viewing angle to see all parts of the disk or burr.
Be aware of heat that builds up.
Stay steady and use pressure, not movement.

 Directed by
 Podiatric Physician
 Wound Care
 High Risk Foot